Navigate to Compliance Libraries
In the blue menu with the crown click on:
- Compliance Libraries
- Manage Libraries
- Add Compliance Library
Enter the appropriate information for your library. Note that under Subscribe to library you should select "Do not subscribe to an external library" if you would like to upload your own library. If you have purchased Compliance Libraries from Web Manuals you will be able to choose for the ones available to you.
You can also specify the owner of the library and notify them that the library has been created by selecting the checkbox next to Notify owner.
Click on Save when all the information required has been inserted.
Add Revision
The newly created library will now be displayed in the Manage Compliance Libraries list. The warning triangle informs us that the library is not yet available due to the fact that we haven’t published any revisions. In order to create a revision, you should click on the library and subsequently click on Add.
Specify the name of the revision and a description (if applicable), and select which previous revision the new one should be based on. In the case of the first revision, there will be no previous revision on which to base it. Finally, click on Save.
Add Compliance Requirement
Once you have added the revision, click on Open to start adding some requirements:

How to add requirements manually
If you choose to add the requirements manually, you should insert the number of new rows you want to add and click on the plus at the bottom of the view.
Once you have at least one row you should insert the information required. The titles in the table header indicate the content that should be inserted in each column.
| Number | The number of the requirement. |
| Requirement | The content of the requirement. |
| Guidance | Guidance material on how to achieve the successful implementation of the requirement. |
| Description | Description of the requirement. |
| Source | Source publication of the requirement. |
| Source Date | Date of the latest publication for the requirement. |
| Valid from/Valid to | The dates within which the requirements are valid. Specifying these dates allows you to have multiple requirements with the same number if their validity dates do not overlap and are consecutive in time. e.g. requirement ‘x’ can be listed twice if in the first instance it is valid until March and in the second instance it is valid from March. |
| Delta sign | If checked, indicates that the requirement has been changed. If unchecked, it indicates that the change is editorial, which means that connections will not be marked as outdated and the requirements will not be listed in the Amendments dialogue. |
The requirements are color-coded according to their numbering (e.g., pink corresponds to level 1.), and they are automatically placed under their parent (e.g., requirement “1 (a) (i)” will show under “1 (a)”) both when you add them to the list manually and also when you import them. If adding the requirements manually, this will occur after saving your changes.
By clicking on the cells, you can add the expected content, click on Close to close the pop-up, and then on Save once you have inserted the information required or Cancel to undo the modifications:
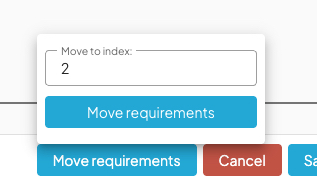
The "Move requirements" button allow you to move the whole line to a different location. Simply click on the colored number at the beginning of the line --> Move requirements --> Specify where it should be moved --> Click Move requirements:
How to upload requirements using the template
If you choose to insert the requirements by uploading them in an Excel spreadsheet, you should click on Actions, which is located at the bottom left corner of this view. Subsequently, click on Import requirements.

Click on Download template in order to download the template that you will need to fill out with the compliance requirements.
Fill out the spreadsheet and upload it by clicking on the Excel file button.
Here is an example of how it can look in Excel. Only the Number needs to be filled in to import the template to your site.
Please note that selecting the checkbox next to Make a test import allows you to test the import of requirements into the compliance library and see what the final result of the import would look like. No changes will be saved during this import.
Activate the Revision
In order to activate the revision, you should go to Compliance → Manage Libraries.
Subsequently, click on the Compliance Library that you created → Click on the overflow menu next to the revision that you would like to activate.
Click on Activate --> Type "YES" to confirm --> click Save.
Note: Once this action is complete the revision in question will become available to the editors and they will be able to start making connections between the requirements and the documents.